My Post Your Money Winner (How To Add Beneficiaries To A Post)
My Post Your Money
A week ago I offered a contest in which a reader of my blog post could win up to 25% of the earnings on three posts created on the @rentmoney blog. Its now time to announce the winner of that contest. Drum roll, the winner of the [My Post Your Money Contest] is @kungfukid. They will be earning 20% of my next three posts created (This winners announcement being the first). Payments will be auto-paid. In the event that auto pay doesn't work on any given post (for any reason) @rentmoney will take one of two actions (1) pay kungfukid manually (2) set kungfukid as beneficiary of a new post. How was a winner chosen (I'm happy you asked). As with the majority of my contest and giveaways; A random number generator decided the winner. Using a random generator makes sure the contest is as fair as it can be for all who participate.
How was the percentage determined?
Another good questions. As stated earlier, The original contest offered up to 25% of my post earnings for a total of three posts. Entering the contest only required a comment which offered the potential beneficiary 10% earnings. Extra actions would increase the potential beneficiaries winning rate. For example reblogging the contest post gave an extra 5%. Each friend tagged added 5% with the max rate being 25% in total (yes it was that easy). This is the second time we ran this contest and we had allot of fun running it each time. This means its very likely we run it again sometime in the near future. Keep your eyes peeled and hit that follow button so you don't miss any future posts.
How To Set Beneficiares On Posts
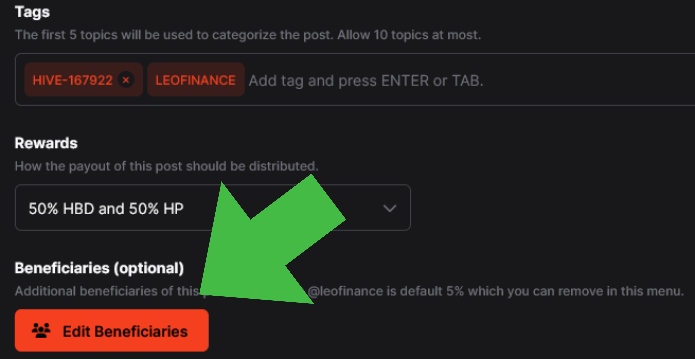
Personally I create most my content using the Inleo front-end (Formally known as LeoFinance). The Inleo front-end makes the Hive Blockchain blogger life allot easier. It has many features that some other front-ends might not have such as adding beneficiaries to created content. Once creating a post on InLeo all one needs to do (before hitting the publish button) is scroll down to the features offered under your about to be created/published post. Its is there you will see Beneficiaries/Edit Beneficiaries. Click that button and a new window will appear. Adding a beneficiary is as easy as placing a HIVEN's username in that section and setting the beneficiary rate. After placing the beneficiary name you will then need to click the add (+) icon next to it. The very last step is to click the save icon. All this can be done in under 30 seconds and is a smooth and easy process. The Edit Beneficiaries icon can be found under the Tags and Rewards options (as shown in the screenshot below).

Posted Using InLeo Alpha
wow! thank you very much!
!PIZZA
You are very welcome.
Thank you for participating.
!PIZZA
$PIZZA slices delivered:
@rentmoney(8/10) tipped @rafzat
kungfukid tipped rentmoney
rentmoney tipped tsnaks
rentmoney tipped kawsar8035
rentmoney tipped kungfukid
rentmoney tipped steven-patrick
I really like this idea, such a wonderful way to give back.
Congratulations @kungfukid
Thanks, we are always trying to think of new intriguing ways to reward our readers for the support given to my blog posts. Thanks for taking the time to read and comment!
!PIZZA
This is a good initiative. And congratulations @kungfukid
Cheers, enjoy some !PIZZA
Rentmoney speaks the truth
I always like a good gif response.
!PIZZA
Thanks for teaching us how to set beneficiaries on posts
Congratulations to the winner
You are welcome, enjoy some !PIZZA.
!LOL
Posted using MemeHive
lolztoken.com
Bartender: Are you positive?
Credit: theabsolute
@rentmoney, I sent you an $LOLZ on behalf of holovision
(9/10)
Delegate Hive Tokens to Farm $LOLZ and earn 110% Rewards. Learn more.
!LOLZ
lolztoken.com
It was the least I could do for him.
Credit: reddit
@holovision, I sent you an $LOLZ on behalf of rentmoney
(1/6)
Delegate Hive Tokens to Farm $LOLZ and earn 110% Rewards. Learn more.
Many many congratulations to the winners.